Diverse as they may be, for those operating in key sectors – be it aerospace, automotive, medical devices or consumer electronics – there’s a shared commonality in the need to keep overall production costs to a minimum, and decrease manufacturing times to ensure time-to-market goals are achieved.
Naturally, in meeting these objectives, there’ll always be a core focus on the types of manufacturing technologies deployed to ensure the utmost efficiency across the production line itself.
Of course, overall efficiencies vis-à-vis cost/time reduction and getting products to customers more quickly extends beyond the manufacturing stage itself and ultimately depends upon the end-to-end workflow – from design through to delivery. An essential aspect of this and one that has its own diversities insofar as technical innovation, is quality assurance, and within that, industrial parts inspection.
Whether for in-process quality assurance, incoming and outgoing parts inspection on the manufacturing floor or in the metrology lab or engineering environment, the need for increased speed from the development cycle to improve time-to-market is a constant quest among manufacturers.
In recent years, there has been a continued increase in the move towards 3D scanning and measurement in the field of parts inspection, yet as is the case with any technology, the attributes and performance capabilities of the various options available for this application vary significantly.
Speed and simplicity without compromising accuracy
The win-win comes from any system that not only fulfils the actual functional requirement demanded of it, but also delivers the essential information accurately, incredibly quickly and via an extremely user-friendly process. Not every solution out there achieves the latter aspects, which invariably affects their ability to provide the all-important reduction in time and costs. For example, although widely-used, traditional coordinate measuring machine (CMM)-type systems, while very accurate, are historically very slow and difficult to programme.
The good news is that recent technology advancements have heralded a new dawn in 3D scanning and inspection. It’s now possible to overcome the challenge of achieving both speed and accuracy simultaneously.
As a result, it’s definitely worth doing your homework and researching the latest systems to ensure that for you as well as your customers, they not only meet today’s needs, but also those of tomorrow so that you futureproof your requirements in this area.
From our own standpoint, when it comes to the scanning/inspection requirements of our customers, we’re tackling some of the most difficult 3D shape manufacturing applications in the world. To ensure that we stay abreast of these needs, we recently introduced a solution that, we believe, sets itself apart from anything else available on the market when it comes to high accuracy scanning and measurement of what are typically very complex parts.
“Micro-wave” ease for quality assurance
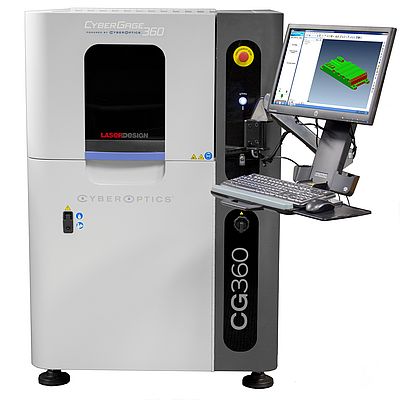
Introduced earlier this year, the latest generation CyberGage360 is an ultra-fast metrology-grade, one-button, automated 3D scanning and inspection system which is quite literally as easy to use as a microwave oven. With no need for complicated programming, it’s no exaggeration to say that anyone could be trained within one hour.
With just one button, the CyberGage 360 conducts a highly precise 360 degree 3D scan of complex parts, accurate to seven microns*, while automatically generating a full 3D inspection report in three to five minutes. During the process, the system collects 10 to 20 million data points (XYZ coordinates), which makes for a genuinely simple operation to achieve an extremely complex inspection.
Once generated, the report provides comparison data back to the CAD model, along with full geometric dimensioning and tolerancing measurement information – essential for parts analysis prior to production. Having such critical information in your hands so quickly is unheard of in our industry, especially if you consider that it can sometimes take around three to five hours to generate 3D inspections from CMM systems.
If you’re a manufacturer operating in one of the key industry sectors I mentioned previously, the ability to access essential data in just a few minutes, enables any necessary design changes to be applied much more quickly. This in turn supports the drive to get products to market faster. The ultimate goal, right?
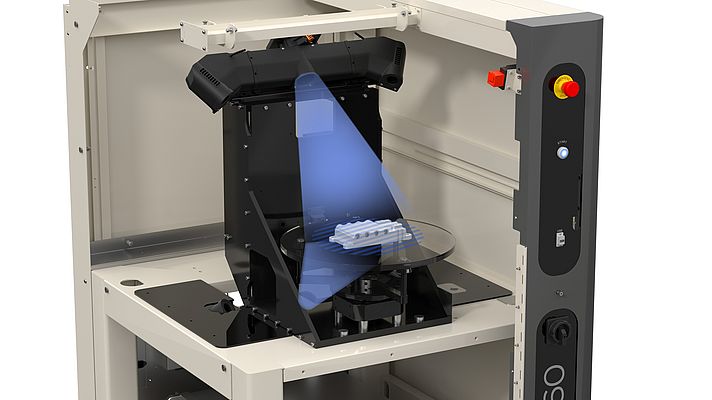
For the CyberGage 360, the ability to help deliver this aim, is achieved via our proprietary Multi-Reflection Suppression (MRS) 3D Projection Scanning technology, which is basically what allows users to capture high-density data extremely fast and accurately. In a nutshell, MRS hardware and software technology accommodates for surface reflectivity/color and various noise-generating problems typically associated with 3D non-contact scanning inspection technologies. By suppressing the distortions in the surface characteristics of the parts under inspection, we’re able to deliver much more highly precise 3D scan data.
Changing the way parts are inspected
Another aspect of the CyberGage360 that is completely unique compared to other measuring systems is its fixtureless design. There’s no need to mechanically affix the part or for the user to turn the part over during scanning in order to capture both top and bottom geometry of the part. The CyberGage360 captures from top to bottom in one pass. The system rotates the part to scan from various orientations, collecting all data in a mechanically precise manner into a single coordinate system. This ensures the most accurate, repeatable 3D scanning for plastic injection molding, die-cast, CNC machined parts, stampings and the production of a host of other complex-shaped items. The operator simply places the part on a glass plate, which eliminates the problem of how to hold what’s being scanned and avoids the usual headache of having to reposition and re-scan in order to get the whole part.
This is vastly different to CMM solutions where it’s not uncommon to have to spend half a day just working out how to hold the part. Such systems also require investment in gauges or fixtures which are costly and time-consuming to make and maintain.
And, once again we’re back at the inherent time/cost issue. Indeed, when it comes down to it, reducing or eliminating unnecessary time and cost across the design and production process is surely a key focus for any manufacturer. Certainly, from speaking to our own customers, a common and primary quality assurance goal in meeting these overall objectives is to maintain a close eye on parts to ensure quality criteria is met. By doing this, material costs are kept to a minimum as wastage is reduced. Meanwhile, production time is upheld which means things are manufactured to schedule and time-to-market goals are achieved.
At the end of the day, from my own company’s perspective, it’s about achieving the nirvana of highly precise scanning and measurement via the simplest process imaginable.
By doing this, we’re effectively reducing the cost of quality for our customers.
* 0.007mm+ L/10000


